Basic Pipeline
Start:
from diffusers import DDPMPipeline
ddpm = DDPMPipeline.from_pretrained("google/ddpm-cat-256", use_safetensors=False).to("cuda")image = ddpm(num_inference_steps=100).images[0]image
Then we need to understand how pipeline do that
This pipeline contains:
- UNet2DModel
- DDPMScheduler
Denoising process
ref with the tutorial
tensor : reflect how “noisy” the image should be at each step. like on step 1, the image should be 98% noisy … noise strength.
In most diffusion models, the noise scale is relative and is often normalized between 0 and 1000 (clean and maximum noise)
This range is a design choice made by the model creators
scheduler.set_timesteps(50)): through 50 checkpoints from completely noisy to completely clean
Deconstruct basic pipeline
- import model, scheduler (change mode to using gpu)
- Model contains neural network parameters that need to be moved to GPU for faster computation
- Scheduler contains mathematical functions and hyper parameters that don’t require GPU acceleration
- Set up the
timestepsin Scheduler - Initial random noise
- Inference:
- Modify the range of image , (-1, 1)—>(0,1 ) —>(0, 255)
A single image might have shape: [1, 3, 224, 224]
- 1 : batch size (single image)
- 3: RGB channels
- 224, 224: height and width
From [channels, height, width] which is (0, 1, 2)—> [height, width, channels] by (1, 2, 0)
 from diffusers import DDPMScheduler, UNet2DModel
scheduler = DDPMScheduler.from_pretrained("google/ddpm-cat-256")model = UNet2DModel.from_pretrained("google/ddpm-cat-256", use_safetensors=False)model.to("cuda")
scheduler.set_timesteps(100)scheduler.timesteps
import torchsample_size = model.config.sample_sizenoise = torch.randn((1, 3, sample_size, sample_size), device = "cuda")

input = noisefor t in scheduler.timesteps: # go through denoising steps  with torch.no_grad():  noisy_residual = model(input, t).sample #the UNet model predicts what noise was added at this timestep  previous_noisy_sample = scheduler.step(noisy_residual, t, input).prev_sample #use the noise prediction to remove some noise from the current sample  input = previous_noisy_sample  #update image

from PIL import Imageimport numpy as np
image = (input / 2 + 0.5).clamp(0, 1).squeeze()image = (image.permute(1, 2, 0) * 255).round()image = image.to(torch.uint8).cpu().numpy() # move tensor from gpu back tp cpu because numpy arrays needs to be in cpu
image = Image.fromarray(image)image
DDPMPipeline
- DDPMScheduler
- UNet2DModel
Deconstruct stable diffusion pipeline
Concept
UNet2DModel :
- ==Basic UNet architecture== for unconditional image generation/processing
- only noisy image and timestep as input
- no additional condition info
- Used when you want to generate images without any specific guidance
UNet2DConditionModel :
- ==extended version== that supports conditional generation
- takes additional conditioning input (like text embeddings, class lables etc)
- cross-attention layers to process the conditioning information
- Used in like Stable Diffusion where you want to control generation with text prompts
# Basic UNetunet = UNet2DModel()noise_pred = unet(noisy_image, timestep)  # Only image and timestep
# Conditional UNetunet = UNet2DConditionModel()noise_pred = unet( noisy_image, timestep, encoder_hidden_states=**text_embeddings** # Additional conditioning)- For text-to-image models, you’ll need a tokenizer and an encoder to generate text embeddings
List:
What you need:
- vae
- tokenizer
- text_encoder
- unet
Tokenizer
Tokenizer 是文本预处理的工具,它负责将自然语言转换为模型可以理解的数字序列。
它首先将输入文本分词,然后将分词结果映射到固定的词汇表中对应的整数编号。这个整数序列就可以输入给后续的模型(例如 CLIPTextModel)。

For example here we can see “ME” match token 614
Attention mask tells you what token is valid what are just padding (0)
VAE
VAE 用于将图像数据编码到潜在空间(latent space),即对图像进行压缩,再利用解码器将其还原回原始图像。
Think it like a compressor
Text Encoder
CLIP: Connecting Text and Images
text encoder is a model,
from transformers import CLIPTextModel# 加载预训练的文本编码器模型text_encoder = CLIPTextModel.from_pretrained("openai/clip-vit-base-patch32")
# 利用上一步生成的 tokenized 作为输入text_embeddings = text_encoder(**tokenized)# 查看输出的文本嵌入结果print(text_embeddings.last_hidden_state)
.last_hidden_state : the tokens final status (after all Transformer layers)
Embedding dimensions:
every token is a fixed dimension vector(for example 512 dimensions). This includes all 各种语义和语法特征。
from PIL import Imageimport torchfrom transformers import CLIPTextModel, CLIPTokenizerfrom diffusers import AutoencoderKL, UNet2DConditionModel, PNDMScheduler
vae = AutoencoderKL.from_pretrained("stabilityai/stable-diffusion-2-1", subfolder = "vae", use_safetensors = True)#load the VAE weight model
tokenizer = CLIPTokenizer.from_pretrained("stabilityai/stable-diffusion-2-1", subfolder="tokenizer")text_encoder = CLIPTextModel.from_pretrained(    "CompVis/stable-diffusion-v1-4", subfolder="text_encoder", use_safetensors=True)
unet = UNet2DConditionModel.from_pretrained(    "stabilityai/stable-diffusion-2-1", subfolder="unet", use_safetensors=True)
from diffusers import UniPCMultistepScheduler
scheduler = UniPCMultistepScheduler.from_pretrained("stabilityai/stable-diffusion-2-1", subfolder="scheduler")
Model folder (structure)
for this models: like "stabilityai/stable-diffusion-2-1". When first time load it, they will be downloaded from internet and stored in the local directory ~/.cache/huggingface/
blobs- This contains the actual model weight filesrefs- References to model versionssnapshots- Saved states of the model.no_exist- Tracking for failed downloads
.from_pretrainedis map hashed filename to actual model components like CLIP, VAE, UNET tokenizer library etc.
You can check what inside each model:
from huggingface_hub import list_repo_files
# List all files in the repositoryfiles = list_repo_files("stabilityai/stable-diffusion-2-1")for file in files:    print(file)
The result:
.gitattributesREADME.mdfeature_extractor/preprocessor_config.jsonmodel_index.jsonscheduler/scheduler_config.jsontext_encoder/config.jsontext_encoder/model.fp16.safetensorstext_encoder/model.safetensorstext_encoder/pytorch_model.bintext_encoder/pytorch_model.fp16.bintokenizer/merges.txttokenizer/special_tokens_map.jsontokenizer/tokenizer_config.jsontokenizer/vocab.jsonunet/config.jsonunet/diffusion_pytorch_model.binunet/diffusion_pytorch_model.fp16.binunet/diffusion_pytorch_model.fp16.safetensorsunet/diffusion_pytorch_model.safetensorsv2-1_768-ema-pruned.ckptv2-1_768-ema-pruned.safetensorsv2-1_768-nonema-pruned.ckptv2-1_768-nonema-pruned.safetensorsvae/config.jsonvae/diffusion_pytorch_model.binvae/diffusion_pytorch_model.fp16.binvae/diffusion_pytorch_model.fp16.safetensorsvae/diffusion_pytorch_model.safetensorsUnconditional text embedding
“无条件文本嵌入”通常指的是在没有明确提示文本条件下生成的文本嵌入
For example, if your tokenized text is [101, 2054, 2003, 102] and your max_length is 8, the padded sequence might look like: [101, 2054, 2003, 102, 0, 0, 0, 0]
you can check them :
print("Padding token:", tokenizer.pad_token)print("Padding token ID:", tokenizer.pad_token_id)#tokenize the text and generate the embeddings from the prompttext_input = tokenizer(prompt, padding = "max_length" , max_length=tokenizer.model_max_length, truncation=True , return_tensors="pt")在许多 Stable Diffusion 相关模型中,文本编码器(通常是 CLIP 的 text encoder)默认最大处理长度确实是 77 个 token。这是因为模型在训练时就限制了序列长度为 77,如果输入超过这个长度,就会被截断或忽略后续部分。
Classifier-free guidance
Classifier-free guidance 提供了一种在推理阶段将这两种生成方式结合的策略,使得模型能够在“保留生成质量”与“贴合条件描述”之间平衡。
w: guidance scale
X_final = X_uncond + w * (X_cond - X_uncond)
latents = latents * scheduler.init_noise_sigma在扩散模型(例如 Stable Diffusion)中,推理过程往往从一段随机噪声开始,然后逐步“去噪”得到最终图像。为了和训练时的噪声分布相匹配,推理时需要在初始 latents 上乘以一个适当的噪声标准差(standard deviation)。
scheduler.init_noise_sigma:表示在推理时所需的初始噪声规模(standard deviation)。latents = latents * scheduler.init_noise_sigma:将随机采样到的标准正态分布噪声(均值 0,方差 1)按照训练时对应的噪声尺度进行缩放,使其与模型训练时的噪声水平一致。
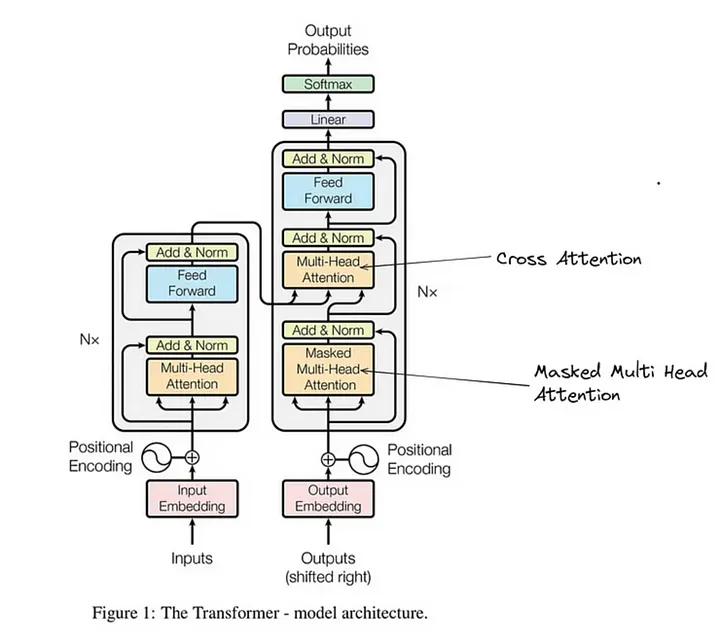
Cross Attention

forward process/ diffusion process : adding noise
AES (128-bit block) in counter-mode mode of operation relies on a 128-bit nonce
NONCe is like 90 bits, rest of them are counter
下面对代码中涉及的几个部分逐步说明:
1. Tokenizer
- 作用与含义
Tokenizer 是文本预处理的工具,它负责将自然语言转换为模型可以理解的数字序列。 - 工作流程
它首先将输入文本分词,然后将分词结果映射到固定的词汇表中对应的整数编号。这个整数序列就可以输入给后续的模型(例如 CLIPTextModel)。 - 参考链接
Hugging Face Tokenizers 文档
2. VAE(变分自编码器)
- 作用与含义
VAE 用于将图像数据编码到潜在空间(latent space),即对图像进行压缩,再利用解码器将其还原回原始图像。 - 代码中的用途
代码中使用AutoencoderKL.from_pretrained("CompVis/stable-diffusion-v1-4", subfolder="vae", use_safetensors=True)是加载预训练好的 VAE 模型权重。 - 输出与格式
- 输入(编码阶段):图像数据通常以 PyTorch 张量形式表示,形状类似
[batch_size, channels, height, width]。 - 输出:在编码阶段,VAE 会输出图像在潜在空间中的表示,同样以张量的形式存储。在解码阶段,则会将潜在张量转换回图像。
- 输入(编码阶段):图像数据通常以 PyTorch 张量形式表示,形状类似
- 如何理解
你可以把 VAE 想象为一个“压缩器”,它将高维图像数据转换为低维表示,这些低维表示捕捉了图像的关键信息,同时保留足够的信息以便重构图像。 - 参考链接
Understanding VAEs
3. Text Encoder
- 作用与含义
Text Encoder 是一个模型(这里用的是 CLIPTextModel),用于将输入文本转换为高维的嵌入表示,也就是文本嵌入。 - 代码中的用途
通过CLIPTextModel.from_pretrained(...)加载预训练模型,代码会输出一个文本编码器模型,该模型可以接收由 tokenizer 生成的 token 序列,并输出对应的文本嵌入。 - 理解输出
输出的嵌入通常是一个张量,其中包含了文本的语义信息。这个嵌入在条件生成(例如 stable diffusion)中起到引导生成内容的作用。 - 参考链接
CLIP: Connecting Text and Images
总结
- Tokenizer:将文本转换为模型可处理的数字序列。
- VAE:在这段代码中加载了一个预训练的变分自编码器,用于将图像压缩到潜在空间,并在需要时解码还原图像,其输出为张量形式的潜在表示或图像。
- Text Encoder:加载的 CLIPTextModel 用于生成文本嵌入,即将 token 序列转换为高维的语义向量,这个模型是文本编码器模型的一部分。
这种分解方式有助于理解各部分在整个图像生成流程中的作用。